


Looking for a cost-efficient way to profit from a moderate downturn? The Bear Put Spread offers a simple debit-based construction with capped loss and capped gain. By pairing a long put with a short put, it balances affordability with downside exposure. When reinforced with target profit, stop-loss, trailing stop, and re-entry rules, it forms a disciplined framework for trading bearish trends.
This blog unpacks the mechanics of the Bear Put Spread, outlines entry and exit rules, and explains how integrated risk controls keep it adaptable to changing market conditions.
Understanding the Bear Put Spread Strategy
The Bear Put Spread is a moderately bearish vertical spread. It’s structured to profit from gradual declines in the underlying asset, while also reducing the cost of holding a single long put. Here is how it’s set up:
- Buy an At-the-Money (ATM) Put Option.
- Sell an Out-of-the_money (OTM) Put Option (Lower Strike).
The result is a net debit trade, where the premium paid for the long put is partially offset by the premium received from the short put. While the short put caps maximum profit, it makes the strategy more cost-effective and defines maximum loss.
Strategy Variations
- Basic Bear Put Spread: Buy higher-strike put, sell lower-strike put. Straight debit trade with no re-entry or trailing stop.
- Enhanced Bear Put Spread (Our Focus): Same two-leg structure, but layered with automated exits, trailing stop-loss, and re-entry logic.
Compared with buying a naked put, this spread reduces premium cost, moderates time decay, and enforces a systematic exit structure.
How the Bear Put Spread Strategy Works
1. Entry Criteria
Eligible Market: The Bear Put Spread is most effective when the underlying is expected to drift lower in a steady fashion rather than collapse sharply. It fits well on broad indices such as NIFTY 50, BANK NIFTY, or S&P 500, as well as on large-cap names that show developing weakness - examples include TSLA, AAPL, INFY, and RELIANCE.
Strike Price Selection: The Bear Put Spread is built by combining two put options with the same expiry but different strikes.
The typical setup involves buying a put near the current market price (ATM or slightly ITM) and selling a lower-strike OTM put.
-
Narrow Strike Gap: Reduces the upfront debit but also caps maximum profit tightly. This setup works well when only a mild decline is anticipated.
-
Wider Strike Gap: Expands the profit potential but comes with a higher debit outlay and slightly more exposure to directional risk.
Expiry Selection: The choice of expiry directly affects both cost and time decay:
-
Weekly Expiry: Well-suited for short-term bearish setups; captures swift downside momentum.
-
Monthly Expiry: Provides a longer window for a gradual decline to play out, offering smoother profit realization.
Lot Size & Positioning: Keep position size such that the net debit equals an acceptable maximum loss. Use a fixed share of trading capital per spread to stay consistent.
Timeframes: The strategy can be applied on 1 to 60 minute charts for intraday setups, with 1- or 5-minute charts giving the sharpest entry and exit signals in bearish moves.
2. Exit Rules & Re-Entry Strategy
The Bear Put Spread relies on a disciplined exit framework to manage downside exposure and secure profits.
The spread is closed under the following conditions:
-
Target Profit Hit: Exit once the net premium reaches the predefined profit threshold, booking gains before the move stalls.
-
Hard Stop-Loss Breached: If the spread value drops below a set percentage of the initial debit, the position is exited to cap losses.
-
Trailing Stop Activated: As the spread increases in value, a trailing stop adjusts downward. If the premium retreats by the set trailing percentage, the trade is closed to lock in profits from the decline.
Re-Entry Logic
Should the position exit through target, stop-loss, or trailing stop, but the underlying resumes its downward move, a fresh Bear Put Spread is initiated at the current ATM strike. The trade then adopts a new reference price and trailing stop for risk control.
Time-Based Exit
A time-driven exit may also be used, where the spread is closed after a specific portion of the option’s lifespan: commonly once most extrinsic value has eroded and the probability of further profit diminishes.
The following flowchart summarizes how these entry, exit, and re-entry rules interact during live execution.
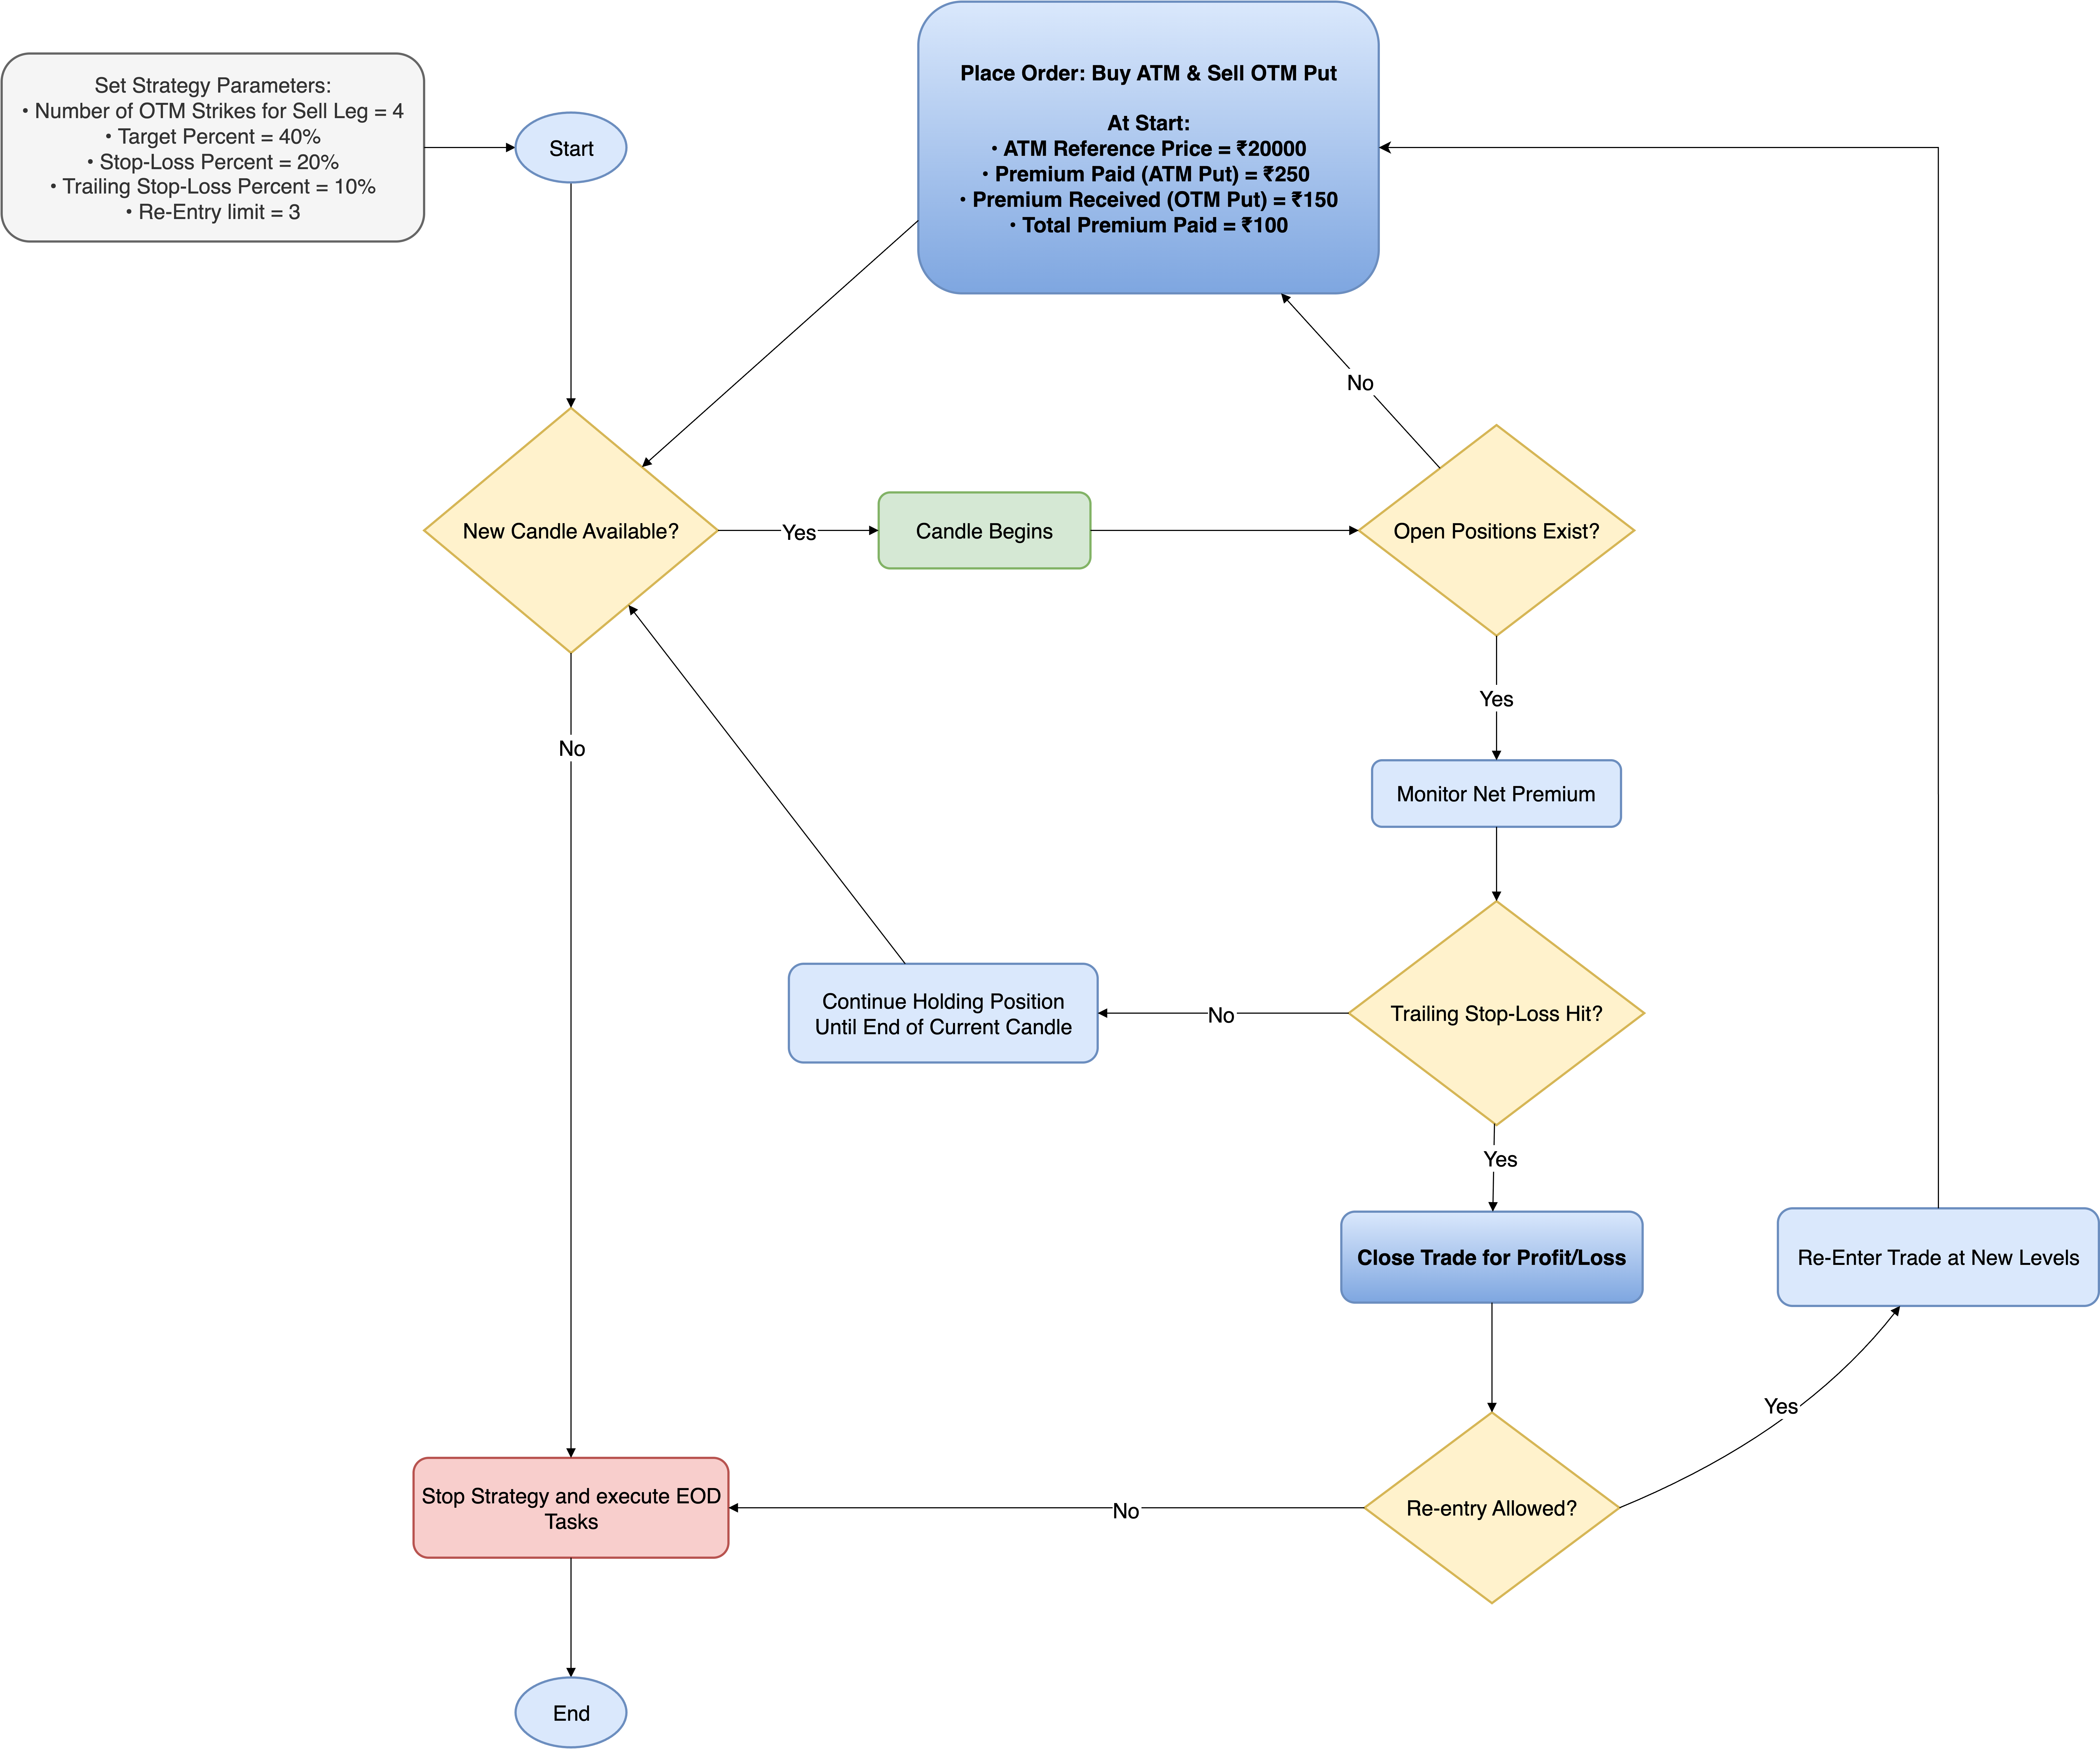 |
|---|
| Figure 1: Bear Put Spread Strategy Execution Flowchart (Values align with the first sample in the upcoming Profit & Loss Calculations section). |
This section outlines the Python implementation of the Bear Put Spread strategy, covering its strike selection, exit framework, and automated re-entry mechanics.
Selecting Instruments and Strikes for Entry
def strategy_select_instruments_for_entry(self, candle, instruments_bucket):
   selected_instruments, meta = [], []

   for instrument in instruments_bucket:
       if not self.reentry_complete.setdefault(instrument, False):
           self.logger.info(
               f"Checking entry conditions for base instrument: {instrument} | "
               f"Determining ATM/OTM option instruments and verifying if PE orders are already placed."
           )

           # Skip the instrument if active order already exists
           if self.child_instrument_main_orders.get(instrument):
               continue

           # Initialize re-entry tracking for this base instrument if not already done
           self.reentry_count.setdefault(instrument, {'reentry_recorded': False})

           # Retrieve total entries so far; skip if re-entry limit reached
           re_entry_count = self.reentry_count[instrument].get('reentry_count', 0)
           if re_entry_count >= self.total_entries_allowed:
               self.logger.info(f"Reentry limit reached for {instrument}. Continue checking for other base instruments..")
               self.reentry_complete[instrument] = True
               # End strategy execution if all instruments reached reentry limit
               if all((self.reentry_complete.get(instrument, False) for instrument in instruments_bucket)):
                   self.logger.info(f"Reentry limit reached for all base instruments. Exiting strategy...")
                   self.execution_complete = True
               continue

           leg_wise_list = [
               (BrokerOrderTransactionTypeConstants.BUY, OptionsStrikeDirection.ATM.value, 0),
               (BrokerOrderTransactionTypeConstants.SELL, OptionsStrikeDirection.OTM.value, self.no_of_otm_strikes_leg_sell)
           ]

           # Retrieve LTP of the base instrument to set up child instruments
           base_instrument_ltp = self.broker.get_ltp(instrument)

           for action, strike_direction, no_of_strikes in leg_wise_list:

               expiry_date = self.get_allowed_expiry_dates(instrument)[0]
               self.options_instruments_set_up(instrument, OptionsInstrumentDirection.EXACT, expiry_date, OptionsTradingsymbolSuffix.PE.value, base_instrument_ltp)

               # Retrieve ATM/OTM child instrument for the given instrument
               child_instrument = self.get_options_instrument_with_strike_direction(instrument, expiry_date, OptionsTradingsymbolSuffix.PE.value, strike_direction, no_of_strikes)

               # Clean up any half-built selection if a leg is missing (avoids partial exposure).
               # Only one child instrument exists in case of partial fill, so [0] indexing is used.
               if not child_instrument:
                   self.logger.info("One leg is missing - removing previously added legs (if any) to avoid partial exposure; otherwise skipping this candle.")
                   if self.instruments_mapper.is_base_instrument(instrument):
                       other_child_instrument = self.instruments_mapper.get_child_instruments_list(instrument)[0]
                       meta.pop(selected_instruments.index(other_child_instrument))
                       selected_instruments.remove(other_child_instrument)
                   break

               # Map the base instrument to its corresponding child instrument in the instruments' mapper.
               # This allows tracking of relationships between base and child instruments for further processing.
               self.instruments_mapper.add_mappings(instrument, child_instrument)

               selected_instruments.append(child_instrument)
               meta.append({"action": action, "base_instrument": instrument})

   return selected_instruments, meta
Code Explanation
1. Re-entry limit & completion check
if not self.reentry_complete.setdefault(instrument, False):
    ...
    re_entry_count = self.reentry_count[instrument].get('reentry_count', 0)
    if re_entry_count >= self.total_entries_allowed:
        self.logger.info(f"Reentry limit reached for {instrument}...")
        self.reentry_complete[instrument] = True
        if all((self.reentry_complete.get(instrument, False) for instrument in instruments_bucket)):
            self.logger.info(f"Reentry limit reached for all base instruments. Exiting strategy...")
            self.execution_complete = True
        continue
-
setdefault creates self.reentry_complete[instrument] as False the first time we see the base. The if not ... block runs only when re-entry is not done for that base.
-
re_entry_count reads how many entries have already been used (defaults to 0).
-
If the used entries >= the allowed total, the code marks this base as finished and skips it. If every base is finished, it flags execution_complete to stop the whole strategy.
2. Skip if a spread is already active for the base
- If child_instrument_main_orders already contains an active order for this base, we skip - we don’t want to open another spread while one is live.
3. Define the two legs (ATM buy + OTM sell)
leg_wise_list = [
    (BrokerOrderTransactionTypeConstants.BUY, OptionsStrikeDirection.ATM.value, 0),
    (BrokerOrderTransactionTypeConstants.SELL, OptionsStrikeDirection.OTM.value, self.no_of_otm_strikes_leg_sell)
]
-
This small list encodes the two legs we want to build: first a BUY at ATM (offset 0), then a SELL at OTM (offset = configured number of strikes).
-
The tuple format is (action, strike_direction, no_of_strikes) so the same loop can handle both legs generically.
4. Fetch LTP once per base (efficiency & consistency)
- The base LTP is fetched once for efficiency and reused for both legs.
5. Per-leg setup + pick child instrument
expiry_date = self.get_allowed_expiry_dates(instrument)[0]
self.options_instruments_set_up(instrument, OptionsInstrumentDirection.EXACT, expiry_date, OptionsTradingsymbolSuffix.PE.value, base_instrument_ltp)

child_instrument = self.get_options_instrument_with_strike_direction(
    instrument, expiry_date, OptionsTradingsymbolSuffix.PE.value, strike_direction, no_of_strikes
)
-
Choose the earliest allowed expiry, prepare option lists for that expiry & LTP, then select the specific child (ATM or OTM) using the helper get_options_instrument_with_strike_direction.
-
If this helper returns None, that leg is unavailable (e.g., insufficient strikes / illiquid), and the code handles that next.
6. Prevent half-built spreads (cleanup when a leg is missing)
if not child_instrument:
    self.logger.info("One leg is missing - removing previously added legs ...")
    if self.instruments_mapper.is_base_instrument(instrument):
        other_child_instrument = self.instruments_mapper.get_child_instruments_list(instrument)[0]
        meta.pop(selected_instruments.index(other_child_instrument))
        selected_instruments.remove(other_child_instrument)
    break
- If you can’t find the child for the current leg, the code logs and removes any previously added leg for the same base (so you don’t end up placing only one side). Then it stops processing this base for this cycle.
7. Register mapping and append final selection/meta
self.instruments_mapper.add_mappings(instrument, child_instrument)
selected_instruments.append(child_instrument)
meta.append({"action": action, "base_instrument": instrument})
- add_mappings records the relationship base - child so later code can find both legs for exits / management.
Creating an Order for a Position
def strategy_enter_position(self, candle, instrument, meta):

   child_instrument = instrument
   base_instrument = meta["base_instrument"]
   _order = self.broker.OrderRegular(instrument=child_instrument, order_transaction_type=meta['action'], order_code=self.order_code, order_variety=BrokerOrderVarietyConstants.MARKET, quantity=self.number_of_lots * child_instrument.lot_size)

   # Store details of successful orders
   if check_order_placed_successfully(_order):
       self.child_instrument_main_orders.setdefault(base_instrument, {})[meta['action']] = _order

       # Increment re-entry count only once per complete entry.
       # Mark re-entry as recorded to prevent multiple increments before exit.
       if not self.reentry_count[base_instrument].get('reentry_recorded'):
           self.reentry_count[base_instrument]['reentry_count'] = self.reentry_count[base_instrument].get('reentry_count', 0) + 1
           self.reentry_count[base_instrument]['reentry_recorded'] = True
   else:
       # Protection logic incase any of the legs fail to get placed - this will help avoid having naked positions
       self.logger.critical('Order placement failed for one of the legs.
Exiting position for other leg, if possible and stopping strategy...')
       self._exit_all_positions_for_base_instrument(base_instrument)
       raise ABSystemExit

   return _order
Code Explanation
1. Market Order Creation
- Places a market order, guaranteeing immediate execution at the best available price rather than waiting for a specific limit price: important when precise timing is required for both legs of a spread.
2. Lot Size Calculation
- Multiplies the user-defined number of lots by the option’s lot size so the order quantity matches the contract’s trading unit.
3. Storing Details of Successful Orders
# Store details of successful orders
if check_order_placed_successfully(_order):
    self.child_instrument_main_orders.setdefault(base_instrument, {})[meta['action']] = _order
-
[meta['action']] = _order
Saves the successfully placed order under its action type (e.g., BUY or SELL) for that base instrument.
This allows the strategy to easily track and later manage each leg of the spread by its underlying instrument and action.
4. Increment re-entry count only once per full entry
if not self.reentry_count[base_instrument].get('reentry_recorded'):
    self.reentry_count[base_instrument]['reentry_count'] = self.reentry_count[base_instrument].get('reentry_count', 0) + 1
    self.reentry_count[base_instrument]['reentry_recorded'] = True
- Increments the per-base reentry_count only once and then sets reentry_recorded = True so the same entry won’t increment the counter multiple times while the spread is still open.
- This prevents accidentally consuming the re-entry budget multiple times if strategy_enter_position is called for each leg individually or if the engine processes this instrument multiple times before the position closes.
5. Naked Position Protection (exit & stop strategy on partial failure)
else:
    self.logger.critical('Order placement failed for one of the legs. Exiting position for other leg, if possible and stopping strategy...')
    self._exit_all_positions_for_base_instrument(base_instrument)
    raise ABSystemExit
-
If the order placement failed, the code tries to close any other leg(s) already filled for the same base (using _exit_all_positions_for_base_instrument) and then raises ABSystemExit to halt strategy execution.
-
This prevents the strategy from leaving a single filled leg (naked exposure) which could produce a large directional loss. Halting the strategy prevents further automatic attempts while the system state is inconsistent.
Exit Strategy: Target and Stop-losses
  def _check_exit_conditions(self, base_instrument, child_leg_orders_dict):
   """
   Evaluate all exit rules for the Bear Put Spread.

   Checks:
   • Target profit – exit if spread rises to the profit target.
   • Hard stop-loss – exit if spread falls below the stop-loss threshold.
   • Trailing stop-loss – once the spread makes new highs, trail a stop to lock in profits.
   """

   # Retrieve current orders and latest traded prices (LTP) for both legs
   ltp_leg_buy = self.broker.get_ltp(child_leg_orders_dict[BrokerOrderTransactionTypeConstants.BUY].instrument)
   ltp_leg_sell = self.broker.get_ltp(child_leg_orders_dict[BrokerOrderTransactionTypeConstants.SELL].instrument)

   # Initialize key levels at entry:
   if self.spread_entry.get(base_instrument) is None:
       entry_price_leg_buy = self.child_instrument_main_orders.get(base_instrument)[BrokerOrderTransactionTypeConstants.BUY].entry_price
       entry_price_leg_sell = self.child_instrument_main_orders.get(base_instrument)[BrokerOrderTransactionTypeConstants.SELL].entry_price
       self.spread_entry[base_instrument] = entry_price_leg_buy - entry_price_leg_sell  # spread at entry
       self.stoploss_premium[base_instrument] = self.spread_entry[base_instrument] * (1 - self.stoploss_percentage / 100)
       self.target_premium[base_instrument] = self.spread_entry[base_instrument] * (1 + self.target_percentage / 100)

   # Current spread price
   # Bear Put Spread value = Long(ATM PE) − Short(OTM PE)
   self.spread_current = ltp_leg_buy - ltp_leg_sell

   self.logger.info(f"Target and Hard Stoploss Check for {base_instrument}: Entry Spread price: {self.spread_entry[base_instrument]:.2f} | "
                    f"Current Spread price: {self.spread_current:.2f} | "
                    f"Target Threshold: {self.target_premium[base_instrument]:.2f} | "
                    f"Stop-loss Threshold : {self.stoploss_premium[base_instrument]:.2f}")

   # Target Profit Check
   if self.spread_current > self.target_premium[base_instrument]:
       self.logger.debug(f"Target profit hit for {base_instrument}: Current Net Premium ({self.spread_current:.2f}) exceeded Target Threshold ({self.target_premium[base_instrument]:.2f}). Exiting positions...")
       return True

   # Hard Stop-loss Check
   if self.spread_current < self.stoploss_premium[base_instrument]:
       self.logger.debug(f"Stop-loss hit for {base_instrument}: Current Net Premium ({self.spread_current:.2f}) dropped below Stop-loss Threshold ({self.stoploss_premium[base_instrument]:.2f}). Exiting positions...")
       return True

   # Activate trailing stop only after the spread rises to at least entry / (1 − TSL%).
   # This ensures the trailing stop is positioned at or above the entry
spread, securing a no-loss condition.
   # We precompute entry / (1 − TSL) for efficiency instead of recalculating each tick.
   one_minus_tsl_fraction = (1 - self.tsl_percentage / 100)
   if self.highest.get(base_instrument) is None and self.spread_current >= self.spread_entry[base_instrument] / one_minus_tsl_fraction:
       self.logger.info(f"Trailing stoploss activated for {base_instrument}")
       self.highest[base_instrument] = self.spread_current  # first highest spread
       self.trailing_stop[base_instrument] = self.highest[base_instrument] * one_minus_tsl_fraction  # initial trailing stop

   # Trailing Stop-loss (TSL) check
   if self.highest.get(base_instrument) is not None:
       self.logger.info(f"Trailing Stop-loss Check for {base_instrument}: Entry Spread price: {self.spread_entry[base_instrument]:.2f} | "
                        f"Current Spread price: {self.spread_current:.2f} | "
                        f"New Highest: {self.highest[base_instrument]:.2f} | "
                        f"Trailing Stop: {self.trailing_stop[base_instrument]:.2f} | "
                        f"(Trail %: {self.tsl_percentage}) ")

       # Update trailing stop whenever current spread exceeds previous high
       if self.spread_current > self.highest[base_instrument]:
           self.highest[base_instrument] = self.spread_current
           self.trailing_stop[base_instrument] = self.highest[base_instrument] * one_minus_tsl_fraction

       # Trigger TSL exit if current spread falls below trailing stop
       if self.spread_current < self.trailing_stop[base_instrument]:
           self.logger.info(f"Trailing Stop-loss triggered for {base_instrument}: Current Net Premium ({self.spread_current:.2f}) dropped below Trailing Stop ({self.trailing_stop[base_instrument]:.2f}). Exiting positions...")
           return True

   return False
Code Explanation
1. One-time per-base initialization of entry / target / stop levels
if self.spread_entry.get(base_instrument) is None:
    entry_price_leg_buy =
self.child_instrument_main_orders.get(base_instrument)[BrokerOrderTransactionTypeConstants.BUY].entry_price
    entry_price_leg_sell = self.child_instrument_main_orders.get(base_instrument)[BrokerOrderTransactionTypeConstants.SELL].entry_price
    self.spread_entry[base_instrument] = entry_price_leg_buy - entry_price_leg_sell
    self.stoploss_premium[base_instrument] = self.spread_entry[base_instrument] * (1 - self.stoploss_percentage / 100)
    self.target_premium[base_instrument] = self.spread_entry[base_instrument] * (1 + self.target_percentage / 100)
-
Computes and stores the actual spread at the time the legs were filled, then derive per-base stop and target levels from that real entry spread.
-
Everything is stored per base_instrument (dict indexed by base), so the strategy can manage multiple spreads simultaneously without state collision.
-
Why get(... ) is None: ensures these levels are computed only once (first time the exit check runs after the fills), avoiding drift from later quote moves.
2. Precompute one_minus_tsl_fraction for efficiency and clarity
one_minus_tsl_fraction = (1 - self.tsl_percentage / 100)
if self.highest.get(base_instrument) is None and self.spread_current >= self.spread_entry[base_instrument] / one_minus_tsl_fraction:
    ...
- The trailing stop is activated only after the spread has moved favorably enough such that placing a trailing stop at TSL% would be at or above the entry spread - this guarantees the initial trailing stop would lock in a no-loss position.
3. Initial trailing stop set-up (first high)
self.highest[base_instrument] = self.spread_current
self.trailing_stop[base_instrument] = self.highest[base_instrument] * one_minus_tsl_fraction
- Records the first “highest” spread value and sets the initial trailing stop at highest × (1 − TSL%) for that base instrument.
4. Trailing stop updates (ratchet up only)
if self.spread_current > self.highest[base_instrument]:
    self.highest[base_instrument] = self.spread_current
    self.trailing_stop[base_instrument] = self.highest[base_instrument] * one_minus_tsl_fraction
- Updates the trailing stop upward when a new high is made, ensuring it only moves in favor of the trade.
5. Trigger trailing-stop exit
- If the spread falls below the trailing stop level, signal exit. (This locks in profits when the spread reverses after making highs.)
Validating Strategy Parameters in Bear Put Spread Strategy
The following code snippet validates key inputs before execution:
def validate_parameters(self):
   """ Validates required strategy parameters. """
   check_argument(
       self.strategy_parameters, "extern_function", lambda x: len(x) >= 5,
       err_message=(
           "Need 5 parameters for this strategy: \n"
           "(1) NUMBER_OF_OTM_STRIKES_SELL_LEG \n"
           "(2) TARGET_PERCENTAGE \n"
           "(3) STOPLOSS_PERCENTAGE \n"
           "(4) TRAILING_STOPLOSS_PERCENTAGE \n"
           "(5) RE_ENTRY_LIMIT"
       )
   )

   # Validate expiry dates
   if len(self.get_allowed_expiry_dates()) != self.number_of_allowed_expiry_dates:
       self.logger.info(f"Allowed expiry dates: {self.number_of_allowed_expiry_dates}, got {len(self.get_allowed_expiry_dates())}. Exiting...")
       raise ABSystemExit

   # Validate numeric strategy parameters
   for param in (self.re_entry_limit, self.no_of_otm_strikes_leg_sell):
           check_argument(param, "extern_function", is_positive_int, "Value should be positive integer")

   # Validate percentage strategy parameters
   for param in (self.target_percentage, self.stoploss_percentage, self.tsl_percentage,):
       check_argument(param, "extern_function", is_nonnegative_int_or_float, "Value should be >0")
Code Explanation:
The validate_parameters function ensures that all necessary inputs are correctly set before execution.
Failure Case 1: Missing Required Parameters
self.strategy_parameters = {}   # nothing supplied
_validate_parameters()
Error:
Need 5 parameters for this strategy:
(1) NUMBER_OF_OTM_STRIKES_SELL_LEG
(2) TARGET_PERCENTAGE
(3) STOPLOSS_PERCENTAGE
(4) TRAILING_STOPLOSS_PERCENTAGE
(5) RE_ENTRY_LIMIT
Reason: strategy_parameters contains fewer than 5 entries; the code bails out early with the provided message.
Failure Case 2: Invalid integer fields (non-positive / wrong type)
self.strategy_parameters = {
    "NUMBER_OF_OTM_STRIKES_SELL_LEG": 0,  # invalid: not positive
    "TARGET_PERCENTAGE": 30,
    "STOPLOSS_PERCENTAGE": 20,
    "TRAILING_STOPLOSS_PERCENTAGE": 10,
    "RE_ENTRY_LIMIT": -1,                 # invalid: negative
}
self.re_entry_limit = self.strategy_parameters["RE_ENTRY_LIMIT"]
self.no_of_otm_strikes_leg_sell =

self.strategy_parameters["NUMBER_OF_OTM_STRIKES_SELL_LEG"]

_validate_parameters()
Error (logged then raised):
Value should be a positive integer
Reason: is_positive_int rejects zero and negative values; both fields must be strictly > 0.
Failure Case 3: Invalid percentage / type fields
self.strategy_parameters = {
    "NUMBER_OF_OTM_STRIKES_SELL_LEG": 1,
    "TARGET_PERCENTAGE": 0,             # invalid (must be > 0)
    "STOPLOSS_PERCENTAGE": -5,          # invalid
    "TRAILING_STOPLOSS_PERCENTAGE": "ten",  # invalid type
    "RE_ENTRY_LIMIT": 2,
}
# fields mapped into self.target_percentage, self.stoploss_percentage, self.tsl_percentage
_validate_parameters()
Error:
Value should be >0
Reason: TARGET_PERCENTAGE, STOPLOSS_PERCENTAGE, and TRAILING_STOPLOSS_PERCENTAGE must be numeric and greater than zero. Non-numeric strings or non-positive numbers fail the is_nonnegative_int_or_float check and raise the same error.
💡 Want to see the complete strategy? Check out the full implementation here.
Ideal Market Conditions for Bear Put Spread
When to Use
The Bear Put Spread works best in markets expected to drift lower in a controlled way rather than collapse suddenly or stay sideways. It benefits when a bearish trend is unfolding and the trader seeks defined downside exposure with limited cost compared to buying a naked put.
Typical scenarios include:
-
Post-Breakdown Continuation: After a support level is broken and prices are likely to trend lower in stages.
-
Bearish Earnings Outlook: Ahead of results where negative sentiment could drive a measured decline.
-
Weak Macro or Policy Signals: When economic data or regulatory actions point to gradual weakness in equities.
-
Moderate Implied Volatility: Ideal when IV is elevated enough to imply movement but not so high that long puts alone become too expensive.
Interpreting the Bear Put Spread Payoff Structure
The following payoff diagram illustrates the profit-and-loss dynamics of a Low-Risk Bear Put Spread on the NIFTY 50 index matching the parameters described earlier.
 |
|---|
| Figure 2: Profit and Loss Diagram |
The green section highlights the profitable region.
-
The spread earns its full profit potential if the index finishes at or below the short put strike (₹19,800) on expiry.
-
In this construction, a ₹20,000 put is bought while a ₹19,800 put is sold.
-
Once the index moves below ₹19,800, further downside no longer increases gains - the payoff plateaus.
-
The maximum profit is the strike gap minus the debit paid (₹100), leaving a capped gain of ₹100 per spread.
The red section reflects the loss zone.
If the index closes at or above ₹20,000, both puts expire worthless and the net debit of ₹100 is lost.
Dashed markers show exit rules applied during the life of the spread:
-
Target Profit (+40%) - locks in ₹40 once the spread appreciates by 40%.
-
Hard Stop (-20%) - exits if the spread value falls 20% from entry, capping the loss at about ₹20.
-
Trailing Stop (10% trail) - adjusts upward as the spread strengthens; for example, if the spread reaches ₹130, the stop resets near ₹117, preserving profits should the move reverse.
Profit & Loss Calculations for Low and High Risk Versions
1. Low Risk Bear Put Spread Strategy
The diagram before illustrates a low risk bear put spread setup on the NIFTY 50 index.
Key Parameters
-
Target Profit (target_percentage): 40% of the net debit
-
Stop-Loss (stoploss_percentage): 20% of the net debit
-
Trailing Stop-Loss (tsl_percentage): 10% below the highest spread value after entry
-
Instrument: NIFTY 50 Index
-
ATM Options Expiry Type: Nearest Monthly Expiry
-
Strikes (num_of_otm_strikes_sell_leg): Buy ATM 20,000 Put and Sell OTM 19,800 Put ≈ four strikes apart
Calculations
(Assume a simple 1:1 relationship between the NIFTY underlying and the spread for illustration.)
-
Total Premium Paid:
Premium Paid – Premium Received = ₹250 - ₹150 = ₹100
-
Target Profit (0.4 × Total Premium Paid):
₹100 × 0.40 = ₹40
Exit when spread reaches +₹40 profit.
-
Hard Stop-Loss (0.2 × Total Premium Paid):
₹100 × 0.20 = ₹20
Max possible loss capped at ₹20.
-
Trailing Stop-Loss:
Set 10% below the highest spread after entry.If spread rises from ₹100 to ₹130,
TSL = 130 × (1 - 0.10) = ₹117.
A reversal below ₹117 triggers an exit, locking in profit.
-
Maximum Profit:
Strike Difference - Net Debit = (20,000 – 19,800) – ₹100 = ₹100.
-
Breakeven:
Higher Strike - Net Debit = 20,000 – 100 = ₹19,900.
Target-Profit & Hard Stop-Loss Outcomes
| Spot Price | P&L With Target/Stop-loss | P&L Without Target/Stop-loss |
|---|---|---|
| 20,020 | Exit at ₹80 = –₹20 (Capped) | –₹100 (Maximum Loss) |
| 20000 | Exit at ₹100 = ₹0 | ₹0 |
| Falls to 19,960 then back to 20,000 | Exit at ₹140 = +₹40 (Target Profit) | ₹0 |
Trailing Stop-Loss Outcomes (10% trail)
Entry spread = ₹100 • Target Profit = ₹140 • Hard Stop = ₹80
(Assume the spot price falls to somewhere between 19960 and 20000, then reverses, so only the TSL governs the exit.)
| Spot Price | P&L With Trailing Stop-loss | P&L Without Trailing Stop-loss |
|---|---|---|
| Falls to 19,989 then back to 20,000 (Breakeven) | Exit around ₹100 (Stop ≈ ₹111 * 0.9 ≈ ₹100 ) = ₹0 | ₹0 |
| Falls to 19,980, then rises (TSL triggered) | Exit around ₹108 (Stop ≈ ₹120 * 0.9 ≈ ₹108) = +₹8 | –₹200 (Maximum Loss) |
| Falls to 19,960, then rises (TSL triggered) | Exit around ₹126 (Stop ≈ ₹140 * 0.9 ≈ ₹126) = +₹26 | –₹200 (Maximum Loss) |
2. High Risk Bear Put Spread Strategy
The diagram below illustrates the profit and loss profile for a high-risk Bear Put Spread setup:
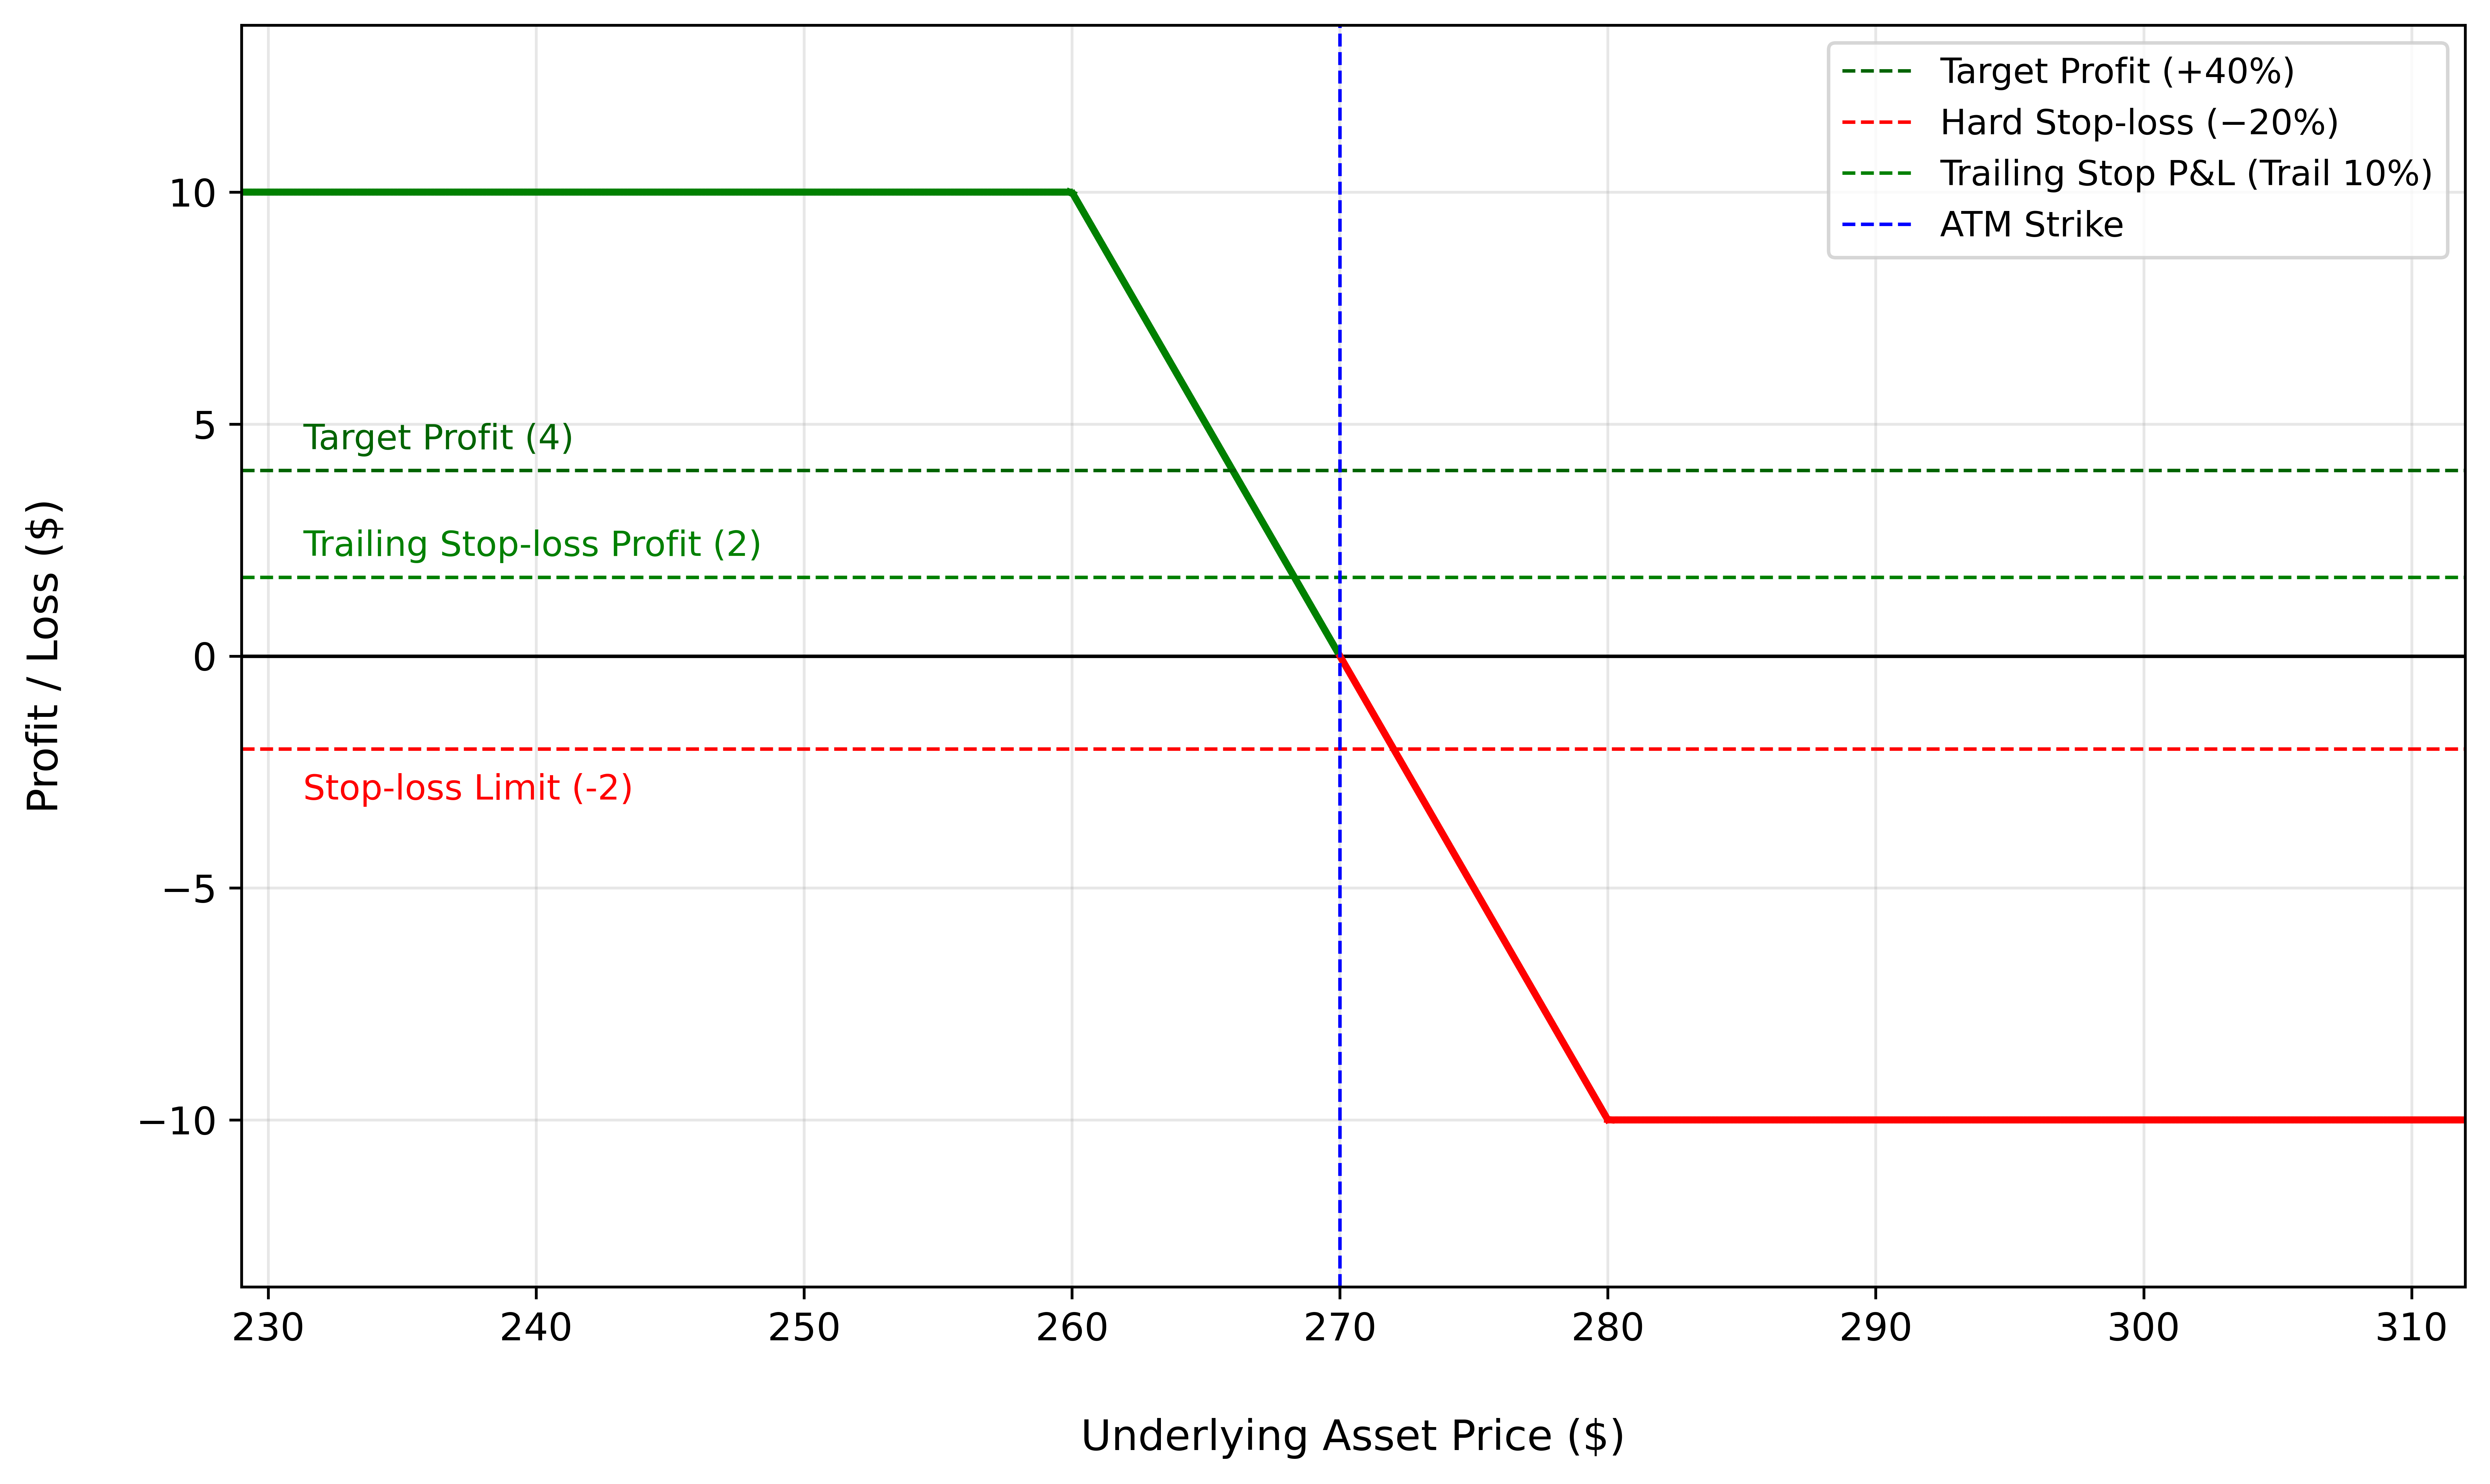 |
|---|
| Figure 3: Profit and Loss Diagram: High Risk Version |
Key Parameters:
-
Target Profit (target_percentage): 40% of the net debit ($10)
-
Stop-Loss (stoploss_percentage): 20% of the net debit
-
Trailing Stop-Loss (tsl_percentage): 10% below the highest spread value after entry
-
Instrument: Tesla (TSLA)
-
ATM Options Expiry Type: Nearest Weekly Expiry
-
Strikes (num_of_otm_strikes_sell_leg): Buy ATM Put ($270) and Sell OTM Put ($250) - 2 strikes apart
Calculations:
(Assume a simple 1:1 relationship between the Tesla stock and the spread for illustration.)
-
Total Premium Paid:
Premium Paid - Premium Received = $12 - $2 = $10
-
Target Profit (0.4 × Total Premium Paid):
$10 × 0.40 = $4
Exit when spread earns $4 profit.
-
Hard Stop-Loss (0.2 × Total Premium Paid):
$10 × 0.20 = $2
Maximum loss capped at $2.
-
Trailing Stop-Loss:
The trailing stop is placed 10% below the peak spread after entry.If spread rises from $10 to $13,
TSL = 13 × (1 – 0.10) = $11.7.
A dip below $11.7 would close the trade, locking in roughly $2 profit.
-
Maximum Profit:
Strike Difference – Net Debit = ($270 – $250) – $10 = $10.
-
Breakeven:
Higher Strike – Net Debit = $270 – $10 = $260.
Target-Profit & Hard Stop-Loss Outcomes
| Spot Price | P&L With Target/Stop-loss | P&L Without Target/Stop-loss |
|---|---|---|
| $272 | Exit at $8 = –$2 (Capped) | -$10 (Maximum Loss) |
| $270 (Breakeven) | Exit at $10 = $0 | $0 |
| Falls to $266 then rebounds | Exit at $14 = +$4 (Target Profit) | -$10 (Maximum Loss) |
Trailing Stop-Loss Outcomes (TSL - 10% trail)
Entry spread = $10 • Target Profit = $14 • Hard Stop = $8
(Assume the spot falls to somewhere between $266 and ₹270, then reverses, so only the TSL governs the exit.)
| Spot Price | P&L With Trailing Stop-loss | P&L Without Trailing Stop-loss |
|---|---|---|
| Falls to $269, then bounces back to $270 (Breakeven) | Exit around $10 (Stop ≈ $11 * 0.9 ≈ $10) = $0 | $0 |
| Falls to $268, then rises (TSL triggered) | Exit around $11 (Stop ≈ $12 * 0.9 ≈ $11 ) = +$1 | -$10 (Maximum Loss) |
| Falls to $266, then climbs (TSL triggered) | Exit around $13 (stop ≈ $14 * 0.9 ≈ $13) = +$3 | -$10 (Maximum Loss) |
Comparing Bear Put vs. Bear Call Spread
In the previous Bull Call Spread blog, we contrasted the Bull Call with its debit opposite - the Bear Put Spread. Both are debit vertical spreads, meaning the maximum risk is limited to the upfront premium paid.
In this post, we’ll extend the discussion by comparing the Bear Put Spread with its credit cousin - the Bear Call Spread. While both strategies are designed for bearish outlooks, they differ significantly in construction, capital requirements, and the way time decay impacts the trade.
The Bear Put Spread and Bear Call Spread are both defined-risk, vertical strategies designed for bearish outlooks. While the Bear Put Spread is a debit spread that requires an upfront premium payment, the Bear Call Spread is a credit spread that generates premium income at initiation. Despite sharing the same directional bias, they differ in trade construction, capital requirements, and how time decay (Theta) influences the outcome.
| Feature | Bear Put Spread | Bear Call Spread |
|---|---|---|
| Market Outlook | Moderately bearish – expect the underlying to fall | Moderately bearish – expect the underlying to fall |
| Option Types Used | Long Put (higher strike) + Short Put (lower strike) | Short Call (lower strike) + Long Call (higher strike) |
| Initial Trade Type | Debit (Net premium paid) | Credit (Net premium received) |
| Maximum Profit | Difference between strikes minus net debit | Net premium received |
| Maximum Loss | Net debit paid | Difference between strikes minus net credit |
| Breakeven Point | Higher strike – net debit | Lower strike + net credit |
| Implied Volatility | Long Vega (benefits from rising IV before entry/hedge) | Short Vega (benefits from falling IV) |
| Theta Impact | Negative (time decay works against you) | Positive (time decay works in your favor) |
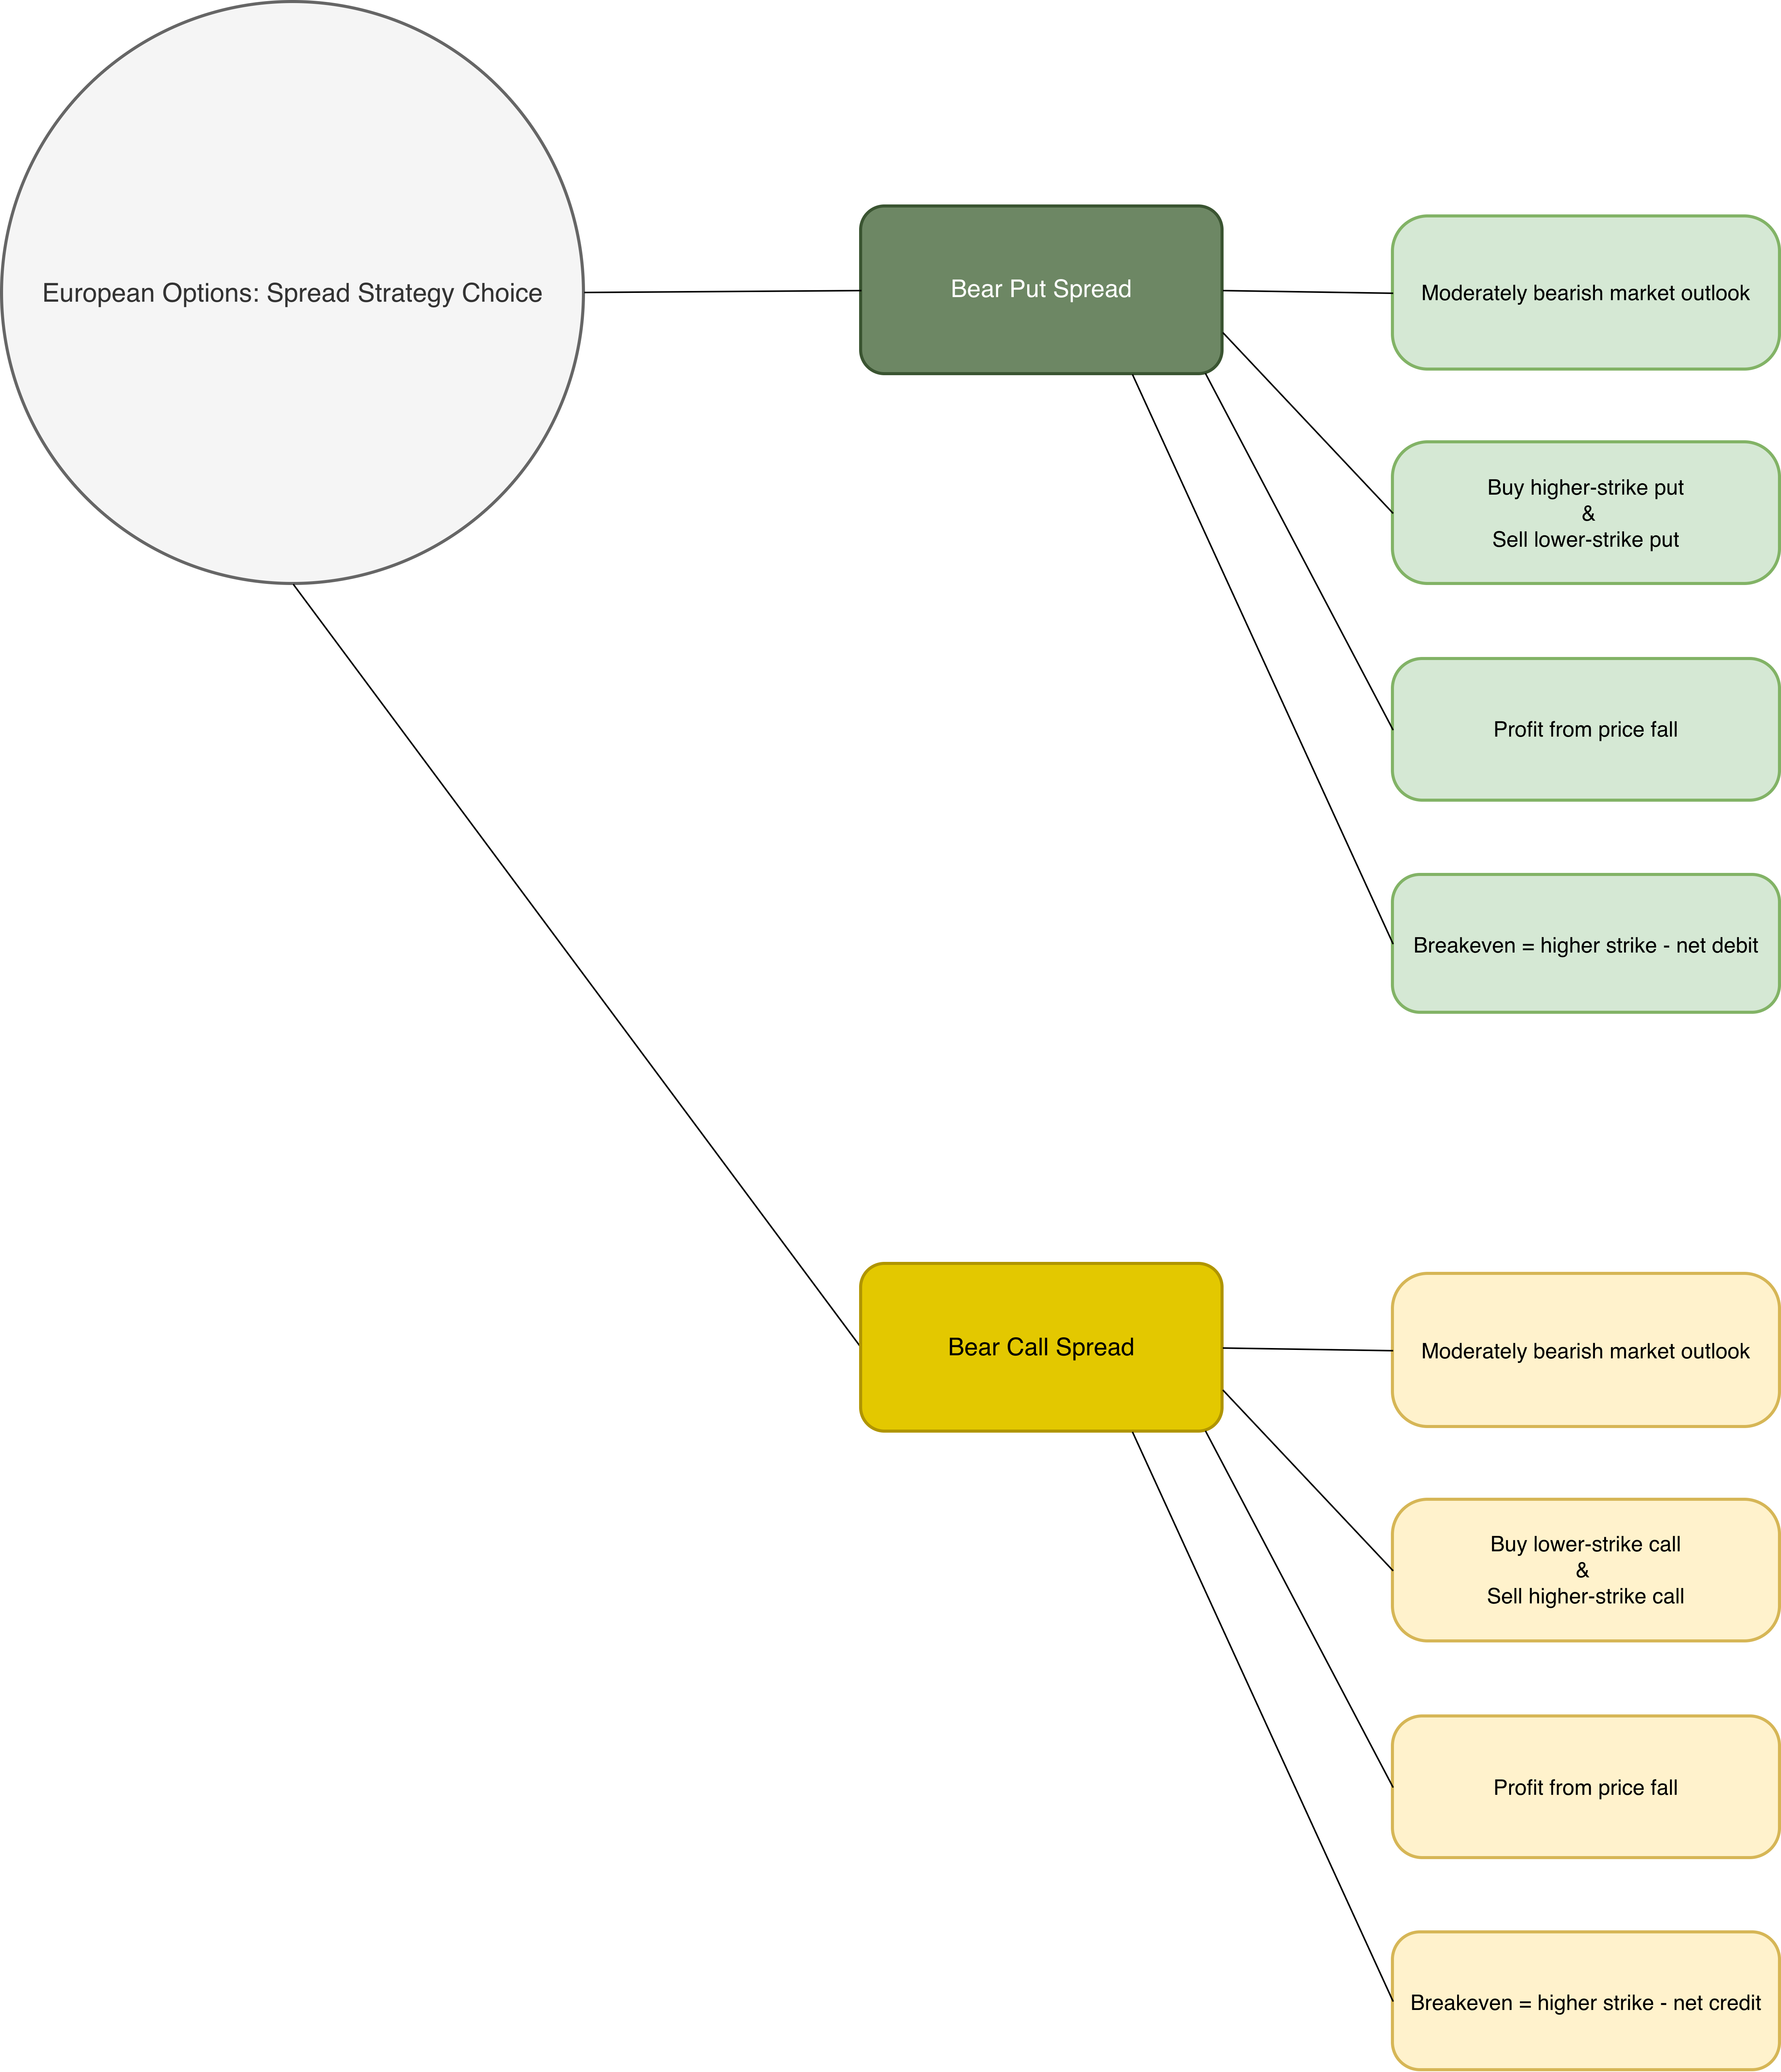 |
|---|
| Figure 4: Bear Put Spread vs. Bear Call Spread Mind Tree |
Which One Is Right for You?
If you expect a moderate decline and prefer a defined-risk debit trade, the Bear Put Spread is ideal. You pay a limited premium to profit from a downside move, with both gains and losses capped.
If you anticipate a mild bearish outlook and prefer to collect premium, the Bear Call Spread fits better. It earns income if the price stays below the short call and limits loss through the long call.
Both strategies offer defined risk for bearish markets- choose the Bear Put for directional downside exposure, or the Bear Call for income with limited risk.
Customize the Strategy with Your Own Parameters!
Traders can fine-tune strike selection, expiry choice, stop-ldev-madeoss levels, and profit targets based on risk tolerance.
👉 For testing on the Phoenix platform of AlgoBulls, head over to our site now!
👉 A Jupyter notebook for this strategy is coming soon. Meanwhile, check out All Available Notebooks for Testing Custom Strategies!
Final Thoughts
The Bear Put Spread becomes even more effective when paired with active risk management - combining real-time P&L monitoring, adaptive stop mechanisms, and flexible position adjustments to respond quickly to changing market conditions.
Key Risk-Mitigation Techniques
✔ Incorporated in the Strategy
-
Target profit & hard stop-loss: Positions exit automatically once the spread reaches predefined profit or loss thresholds. This ensures discipline and prevents emotional decision-making during volatile down moves.
-
Trailing stop-loss: Trails the highest spread by the configured TSL% to lock in gains when the move reverses.
-
Re-entry logic: If the position exits due to a stop or target but bearish momentum resumes, the strategy automatically re-enters at the current ATM level, maintaining participation in extended downtrends.
✔ Additional Enhancements
-
High-frequency P&L tracking: Monitoring profit and loss at a finer interval than the candle size (for example, every 30 seconds on a 1-minute chart) enables quicker detection of reversals or exhaustion during sharp intraday drops.
-
Position adjustments: Traders can fine-tune strike selection, lot size, or expiry if volatility conditions or the pace of the decline change during the trade. For example, shifting to slightly ITM puts during strong selloffs can maintain delta exposure while managing cost.
With layered exits, trailing stops, and re-entry logic, the Bear Put Spread stays disciplined yet adaptive - well suited for moderately bearish markets where traders seek defined downside exposure, limited risk, and the ability to lock in or extend gains as the trend unfolds.